Sunday, March 31, 2013

Easter made HAPPIER with Lisa Spangler!

Hi Bloggers! Happy Sunday + Happy Easter! I hope you're having a great day! I'm totally thrilled to have not one but 2 gorgeous & festive projects from our dear friend, Lisa Spangler! Without further ado, I will let Lisa explain how you can make your own versions of these beauties!

Hi! It's Lisa Spangler, and I'm so happy to be here! Today I have two projects to share with you that both feature the Tim Holtz Easter Elements die set. I love this die set, and even though it has “Easter” in the name I think it's so versatile that you can use it all year long!


First up, I'm going to share a quick and easy place card setting for your Easter table.
Shop the supplies:


Just cut two bunnies out of Hero Arts mocha paper for each place card that you need. One will become the front of the bunny and one will be the back. This die works so well that you can cut two bunnies out in one shot – real time saver! Here's another tip: Hero Arts papers are colored on one side and white on the other, so place your papers so that the white sides are touching when you run it through the machine.


Clear emboss the bunnies, then rub on tea dye and vintage photo distress inks. Next, use a bone folder and a ruler to score the bunny for the back as shown.

Next, put adhesive above the score line and press the two bunnies together. I like to use a glue stick for this as I find that it holds better.


For the nose, put a glue dot where the nose goes, trim off any that hangs over the edge, and adhere pink flocking. So cute!

To finish up, adhere a pom-pom tail to each bunny, then cut out a banner and stamp each person's name with gold ink. Adhere with foam tape and you are done!

--------------------

Next I wanted to share an idea using the butterfly die that comes in the set. This may look complicated, but it's actually pretty easy thanks to the magic of distress markers. I like to grab my trusty butterfly field guide when I'm coloring butterflies so I get some ideas for their markings. I don't worry about making them too realistic, though! 

 Shop the supplies:


Start out by cutting a butterfly out of watercolor paper. Then color the body and the wing tips. Go over them with a detail water brush and tah dah! You are on your way.

Now add color to the wings and go over your markings with the detailed water brush again like so:


Let this dry (you can help it along with a heat gun if you like.) Then add some gray and black dots, and some lines using the fine point end of the black and gray markers, then go over with water again and let it dry. Here's how it looked before going over it with water:
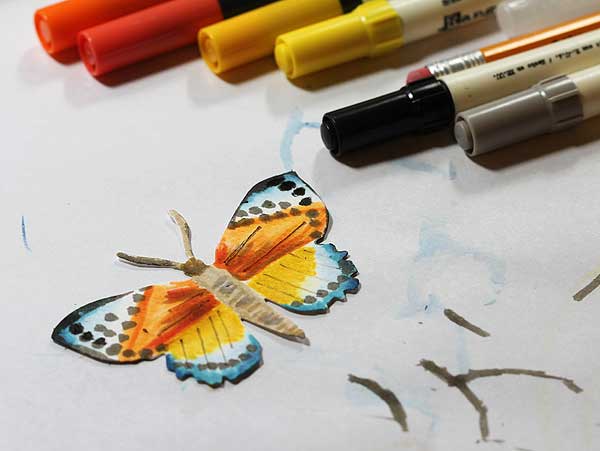
To finish up the butterfly, give it a good mist with perfect pearls and water and let dry. Just be sure your butterfly is dry before you mist it so the colors don't run too much! Here's a closeup of the finished butterfly:

To make the card base, first stamp Hero Arts' Life Can Be with Charcoal mid-tone ink on a white notecard. Then squish a tea dye ink pad on an acrylic block to make a palette. Grab a broad tip water brush and pick up some tea dye ink, and paint the upper left and lower right corners. While it's still wet, brush on some vintage photo distress ink, picking the ink up directly from the ink pad. Let dry.


Mist the card with gold, buttercup, and boss lady Mister Huey's and let dry. Then add washi tape, gold glitter tape, sew on some sequins, adhere the butterfly with foam dots. All done!

Thanks so much for joining me today! Happy spring! xo

Thanks for reading, and thanks again to Lisa!!


Blog Candy Alert! Join our following and comment on this post for a chance to win a special blog candy!


Pin It
SUBSCRIBE TO: This Blog | Our Newsletter
WE'RE SOCIAL: Facebook | Twitter | YouTube | LinkedIn | Pinterest | Google+
TAKE THE CHALLENGE: Simon Says Stamp Challenge! | Vintage Simon Says Stamp & Show Challenge

Saturday, March 30, 2013

KP is the brand to SEE!

Hi Bloggers! Happy Saturday to you!

If you haven't heard, we've more recently added the fantastic Kelly Purkey, to our team and we couldn't be more excited about it! From stamps (both clear and mounted), to stickers, badges, sequins, kits, & more... this line of products is sure to have a product or two that will tickle your fancy!

Below are just a few fun inspirations from some very talented designers to give you an idea what kind of fun you can get into with this brand!

Created By: Cristina Kowalczyk

Created By: Lorraine Aquilina

Created By: Liz Tamanaha

 Created By: Britta Swiderski

 Created By: Nichol Magouirk

Shop the brand:


Thanks for reading today!


Blog Candy Alert! Join our following and comment on this post for a chance to win some fun blog candy! Winner will be announced soon, good luck!


Pin It
SUBSCRIBE TO: This Blog | Our Newsletter
WE'RE SOCIAL: Facebook | Twitter | YouTube | LinkedIn | Pinterest | Google+
TAKE THE CHALLENGE: Simon Says Stamp Challenge! | Vintage Simon Says Stamp & Show Challenge

Friday, March 29, 2013

Amy Tan Inspiration from her NEW line? YES, Please! + Class Giveaway

Hi Bloggers! Happy FRIDAY to you! I really enjoy Amy Tan's style, and her newest collection with American Crafts does not disappoint! With cheery colors, fun surprises of texture, and that cool hand-drawn playfulness, you're sure to love it too!

Big thanks to Amy for sharing these awesome scrapbook pages and front cover of a daybook! I hope they inspire you to craft and maybe even check out this new collection!

Shop Yes, Please, or ALL of Amy's Products!:


I hope this blog has been very inspiring and dare I say it, "Craft-cational" ;) Have a happy day!!
Thanks for reading!


----------------------------
BONUS! Class Giveaway!
Comment on this blog for a chance to win a spot in this class! If you have already bought the self-paced class and win, you will get a refund of your purchase or you can send a spot to a friend!
*Previous class participants are not eligible for the giveaway. 


The Inspiration University: Design Principles class is now ready as a self-paced class! Join Britta Swiderski as she walks you through the Design Principles and shows dozens of methods and techniques for applying them to your own projects. 

The class consists of 10 complete lessons with additional introduction and review, over 5 hours of exclusive video content. Each lesson is centered around four videos: a traditional whiteboard-style lesson, the making of a helpful reference tag and two cards. There are more than two dozen never-before-seen cards from Britta and a wonderful group of guest designers, all helping you understand and learn about the Design Principles. It's like going to college for card making and design all at the same time! 

Included with this self-paced class is a refined, printable ebook to guide you through the lessons and supplement each lesson with more tips and tricks. All class material is accessed through the portal at brittaswiderski.com and Google Drive; class participants have lifetime access to all class material.
For more information or to purchase a seat in the class, please visit brittaswiderski.com/shop. See you there and get ready to go back to the most interesting class in college!

Pin It
SUBSCRIBE TO: This Blog | Our Newsletter
WE'RE SOCIAL: Facebook | Twitter | YouTube | LinkedIn | Pinterest | Google+
TAKE THE CHALLENGE: Simon Says Stamp Challenge! | Vintage Simon Says Stamp & Show Challenge

Thursday, March 28, 2013

Gift Card Holder Envelope (April 2013 Card Kit)


Hi all! Kristina here.

Did you know that the small Fancy Pants envelopes in the April 2013 Card Kit fit a gift card perfectly? Yay! It was a happy accident when I discovered that. After I figured that out, I knew they would make awesome gift card holders that I could decorate.

I kept the design super simple since the polka dot pattern was so cute. Just added a bit of stamping, a striped flower accent, and drew a thin string and bow with a marker. Super easy way to personalize a gift card holder. :)

NOTE: The April 2013 Card Kit is now sold out! However, you can subscribe now and you will receive card kits monthly starting with the May 2013 Card Kit--which is A-MAZ-ing! Can't wait to show you all what's in the May 2013 kit! It will be revealed on April 15, but quantities are limited. So if you're on the fence about a subscription, now's the time to lock that in and be guaranteed a kit.

Anyhow, enjoy the video!

Watch video below | Watch at YouTube


Pin It
SUBSCRIBE TO: This Blog | Our Newsletter
WE'RE SOCIAL: Facebook | Twitter | YouTube | LinkedIn | Pinterest | Google+
TAKE THE CHALLENGE: Simon Says Stamp Challenge! | Vintage Simon Says Stamp & Show Challenge

Wednesday, March 27, 2013

Simon Says Stamp Exclusive Spring 2013 Blog Hop + Giveaways

Did you anxiously await the arrival of the new Simon Says Stamp Exclusive dies and stamps? We are so excited to offer you these new products – there is something for everyone. Simon Says Stamp Brand products, Kelly Purkey products, coordinating die and clear stamp sets, animals, alphabets, background dies, banners and more!


So what do you get when you combine all of these new products with 14 amazing designers? An infinite number of creative possibilities and one rocking blog hop! Get ready to be inspired. Here is a sneak peek of the great ideas you will find along the way!


And if you stop by each designer’s blog and leave a comment? You will be entered in a drawing for a Simon Says Stamp Goody Bag. Every designer will have a giveaway so that is 14 chances to win! We will randomly draw winners on each blog at 9:00 AM EST on Wednesday, 4/3/13 so be sure to leave your comments by then.

Ready to start hopping? Have fun!

Shari Carroll
Jennifer McGuire
Kathy Racoosin
Laura Bassen
Kelly Purkey
Cristina Kowalczyk
Nichol Magouirk
Sarah Moerman
Lisa Spangler
Debby Hughes
Kristina Werner
Lucy Abrams
Joy Taylor
Jana Millen

Enjoy!

Pin It
SUBSCRIBE TO: This Blog | Our Newsletter
WE'RE SOCIAL: Facebook | Twitter | YouTube | LinkedIn | Pinterest | Google+
TAKE THE CHALLENGE: Simon Says Stamp Challenge! | Vintage Simon Says Stamp & Show Challenge

Tuesday, March 26, 2013

Come Sail Away (Selective Embossing)


Hello, all! Kristina here. :)

Today I made a card using a DIY selective embossing diffuser (see another example HERE). Simon Says Stamp sells diffusers by Tim Holtz, but I made my own by cutting a rectangle out of six sheets of cardstock and adhering them together. For more instruction, be sure to watch the video below. And of course, you'll have to experiment with your die cutting machine to get the best die cutting sandwich. Every machine is just ever so slightly different.

I love the detail of both the dry embossing with this folder and the heat embossing with Ranger Super Fine Detail Gold embossing powder and the Come Sail Away stamp set by Kelly Purkey.


The gold embossing with the Navy ink from Hero Arts just screams nautical to me! Love it! And the striped circle from Circle Friends fit right in.

Anyhow, enjoy!

Watch video below | Watch at YouTube


Pin It
SUBSCRIBE TO: This Blog | Our Newsletter
WE'RE SOCIAL: Facebook | Twitter | YouTube | LinkedIn | Pinterest | Google+
TAKE THE CHALLENGE: Simon Says Stamp Challenge! | Vintage Simon Says Stamp & Show Challenge